Showing posts with label Essie. Show all posts

Monday, May 11, 2015

Chipped nail polish rescue! ... Maybe?

Hey guys! A new nail art idea, well I'm putting sure it's been around for a while but I decided to do something different for me. One of the worst thing about painting your nails is when it chips. I hate when that happens! So tonight I was too lazy to take off the polish I put on Friday night. Such a disappointment when polish only lasts 3 days. Maybe I have high expectations? 
Anyways I decided to try and save my polish that was already on my nails. I originally had Essie Master Plan, which is a purplely gray color. I came up with this random idea of using office hole reinforcement labels, you know, the lil white circle stickers when you tear a hole in your paper. I put those towards the bottom of my nail to make a small semi circle. I used them as a guide to prevent my polish going where I didn't want it to. I then painted my nails with a red OPI color. I don't have the name of it because it was a very small mini bottle and there is no name on it. Sorry! But it's a bright pretty red, reminds me of latino Miami red dresses. I'm weird. Lol. So I put two coats of this red color on and then when my nails fully dried, I took the stickers off. Then top coat it. I wouldn't recommend doing this if you don't have a lot of time. This took probably 45 minutes if you count the first time I painted my nails with the Essie Master Plan color. But I would like to see what it would look like with fresh painted nails all together, no original chipped paint. :) 

Basic hole reinforcements. Just in case you didn't understand what I meant. 

Love these colors together. 

This is my left hand. I couldn't hold my iPad and take a pic of my right hand. Just not talented enough. 


So I basically like how it all turned out. :) It was a lil rough around the edges of the stickers, but I learned you push very hard on them and I also used the end of a nail file to press the striker into the edge of my nail. That was where I found it to be worse in the beginning. I'll be trying this again! 


Sunday, April 12, 2015

Trying something new.

Hey! Okay, so random talk here but does anyone feel like they can't just paint their nails all one color anymore? There has to be some kinda design or nail art...well for those like me that are incapable of creative artsy things, it's just not gonna happen. I've done it all it seems like, the Pinterest ideas and even the nail design kits. If I'm ever gonna have pretty designed nails, it's gonna because I got them done by someone else. Lol. 
So now that's outta the way, I tried something new today! I got the Essie 'matte class' gift set pack at Ulta when I was hanging out with Amber and Megan during our Gustavos weekend. It is 3 nail polishes: matte about you (which is a clear matte),  power clutch, and master plan. I've never tried any Essie polishes before but I've seen them all over Pinterest. They always seemed to have the prettiest colors! I also never tried any matte clear polishes. There was a lot of firsts going on with this. Oh! And I didn't even tell you the best part about this set, it was totally on sale! Originally $17 and I got it for $8.50. Oh yeah! I'm pretty sure thats around the same price of one bottle. You just can't beat that. 
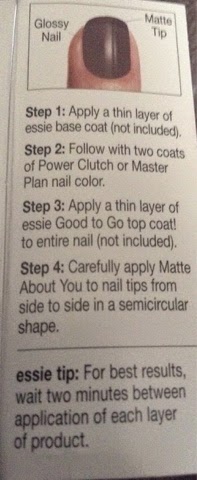
On the side of the box, it gives you a tip of how to use your matte color. Paint your nails one of the colors, paint on a top coat, then use the matte on the nail tip like a French tip almost. So I gave it a shot, why not right? ... Didn't really turn out for the best for me. I've now learned I totally don't have a steady hand. I think if I try this out again, I may have to see about using those hole reinforcement stickers. I probably should've tried that in the beginning but yeah, you live and learn. Haha. Anyways, I went with the color Master Plan. It's such a great color! I love it. It's a grey with a purple undertone! It'll go with everything. 
Also I'm not too sure on the whole Essie brand...it seemed like the polish was thin and it wouldn't go on very smoothly. I love the color just maybe I'm being picky? Idk, I think I may have to stay with OPI polishes. Let me know what you guys think? 

The instructions. 

Before I put on the matte tip. 
Left hand. 
Right hand. 


Sunday, January 25, 2015

Trying out Nail Stickers for the First Time

Hey guys! It's Ashley. I intended to do a January Boxycharm today but... I had A.D.D. Lol. Megan does a lot of nail polish posts so I decided to do one. I've never done the nail sticker things before so today was the day! I wanted to try out Essie sleek stick nail strip stickery things. I got 3 different packs of these at the Dollar Tree a while back and haven't been brave enough to try them out yet. 
I'm not sure what the other brands include in these stickery nail type things but Essie had 18 nail strips, 1 cuticle stick, 1 file and buffer, and 1 instruction sheet in their package. The style I did today is called Stick with Style. 
Starting out I was pretty worried about how this was gonna turn out...the instructions on the back of the unopened package is super vague. Basically all it said was prep, apply, and perfect with little pictures beside each step. Yeah, time to research it on YouTube. I actually used this video here to see more info on how to do it. http://youtu.be/mvwDDECmKk8 The style she used is actually the same one I did today too! Once I opened the package, I found the instruction sheet very helpful too. 
Anyways I started out using nail polish remover just to clean my nails up. Essie recommended using rubbing alcohol, I didn't have that so nail polish remover it was. I then pushed back my cuticles. Wow, I could really tell I haven't pushed back my cuticles in a long time. Next I put my fingers up under each nail sticker, starting at the cuticle, to see which sticker would fit best. Once I found the right cuticle size, I took the sticker off and applied it to my nail starting at the bottom of my nail working pressure into the sides and up. I applied a lot of pressure during this step. You'll see that you're left with a lot of the sticker off of your nail, at least I did cause I have really short nails. I then bent the excess sticker over to the edge of my nail. Next I started filing my nails. I tried to use the file it comes with but, ehh...I found my own file works much better. It was pretty simple, actually. I didn't have any mishaps so I still have 8 stickers left over. I think I might try and use them as an accent finger or toe nail. Gotta get the full value, even if it was only $1. Lol. 
The only con I really saw with this is it takes a long time to do. I don't know if it is because I'm new at this and with practice it'll take less time? It took me about an hour to apply these bad boys, I could've painted my nails and had them dried way before that. That's the only real complaint I can say about that so far. 

Here's a picture! Top is my right hand and bottom is my left hand. 
They're a light pinky color with tiny circle dots which are raised up, adding a texture to it. 

I'm not sure how long these will last, hopefully at least the week. Fingers crossed. I'll update how long they lasted later. If this goes will I really wanna try other brands...such as Jamberry! I've heard great things about them. Anyways hope you all have had a great weekend and talk at you soon with updates on Essie sleek stick! 


Update! Three days later....
Okay, here's the deal. After wearing these for three days now, it's peeling at the tops of my nails. I realize that polish usually starts to chip after a few days too but I thought maybe these would last longer. I did make a mistake with them though. After making my post, I decided that I wanted to try and make them last longer. I started researching it. I found many people suggesting it may last longer with a top coat, therefore I applied a layer in my pinky nail. Not the best idea. The top coat just ate into the nail polish sticker. 
Bottom line- would I recommend this to other people? I honestly don't know. I would like to try some other brands to see how they hold up to them since this was my first time. I do like the idea of using them before a special event for example. Just a tip, apply them a day before so they will look fresh and pretty. 

Top- left hand, as you can see my pinky is a lil missed up. Lol. 
Bottom- right hand